How to Use Security
The first step to activate security is to run Security from Processing > File Maintenance > Employees >
user Security and Levels.
You may need to enter a password to enter the Program. If this is the first time you have used Security,
Try User Name: Manager and Password: Pass. If you have a problem getting in with this password, email me
and I will give you a Back Door Password.
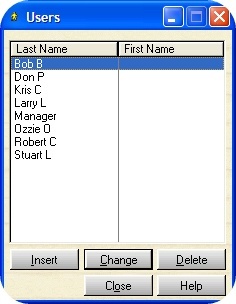
After you have loaded the Security Browse Table, you need to delete the trial Version Users and add the users
in your company and set their access levels. The Higher the Access Levels, the greater their permissions will be.
EXAMPLE: The Owner (You) Level 9 - Your Office Person Level 6 - Technicians Level 1 -
Clerks/Order Takers Level 3.
These are suggested levels, after you have used Security you will be more able to determine your own user levels.
Press Insert to Add New User - Important, Users must have already been entered in the Employee Table.
Pressing the Right Mouse button will give you a list of Users entered in the Employee Table. If the Employee you
wish to add to Security is not in the list, you must go to Employees > Browse Employee File and Add them.
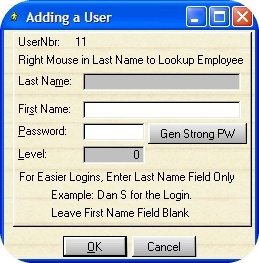
It is recommended you just use the Last Name Field to save time when logging in. If you fill out both First and
Last Name, the user will have to enter both of the items to Logon.
Enter a password of up to 8 characters, or have the Computer Generate a Strong Password for you.
Next set the user level to what is appropriate for their position. Then Save the Information.
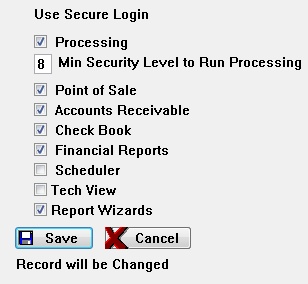
After you have entered all your Security users you need run Processing > Control > Login
Security
To activate security, you need to check Use Secure Login for the modules you want to activate.
I would recommend enabling all of the Modules, and you will later see advantages to having all enabled.
When you are ready, save the configuration form by clicking Ok.
On the Fly Security (RunTime)

The Garage Partner allows On the Fly security settings, which means you can set the desired security
level from with the program. You will need to be logged in as a Level 9 User to set any of these levels.
When you log on, you will notice a yellow Lock  on the Toolbar Menu. this Lock is only active on the Toolbar Menu. this Lock is only active
for a level 9 User.
Now let's say you want to protect your customer list from being deleted, unless you approve (Override).
Access any customer record by clicking change from the customer list. As soon as the Update form appears,
click the Lock on the Toolbar.
After you click the Lock, a runtime security screen will appear. you can restrict access to the entire window,
or individually restrict Insert Change and / or Delete.
For Reports
-- Press the Shift Key while clicking on the Menu Item for the report. This will bring up the
Security window in 90% of the reports.
Exceptions
If the report calls a window first, you may be able to click the Lock after the window opens
so that it will protect the window that calls the report.
Manager Override
This allows you to take over an employees keyboard, enter you password, and allow certain customers to be deleted.
the following windows show a manager override
You can protect almost every level of access in any of The Garage Partner Modules. Just remember, that if you
leave a module logged in as a Level 9, any one has full permissions. the only time you would log in as Level 9,
is to perform security maintenance, or in some instances for End of Period Processing.
|