Customers can be Added - Changed - Deleted at any time, either by clicking the Customer Icon Button in Point of Sale, by clicking Customers in Processing > File Maintenance, or by adding them on the fly when adding new Work Order.
Saved Estimates- List any saved estimates for this customer.
Invoice History - Lists all previous invoices for this customer in Detail
Invoice Summary - Summary list of previous invoice by Date Range.
Google Maps: Shows the customer address and how to get there.
Clicking on any of the TABS will allow you to view and edit related customer information.
Example - To View list of Customer Vehicles, Click the Vehicle TAB.
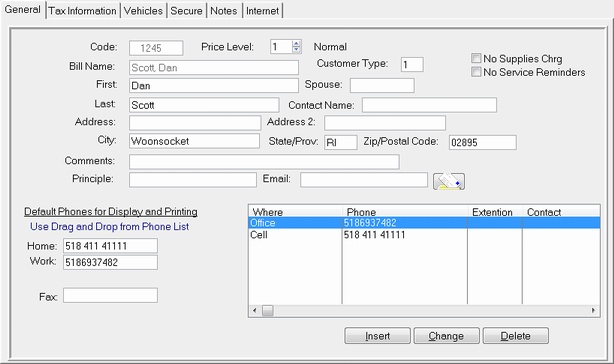
The Customer Number is automatically created by the program.
Price Level - Use the tiny up and down arrows to select a price level. Customer will be billed using the selected price level automatically
Last Name - First Name - Fill in the customer's Last and First Name.
If this is a Business, put the Business name in the Last Name field. The Bill Name will be filled in automatically.
Notice the Button at the bottom of the window. If Business, DO NOT enter a first name.
S/P: Spouse or Partner
Default Email:
Use Right Mouse or F2Key to define as many email addresses as you like. Simply pick the default address to display.
Customer Web Site can also be defined there.
Default Phones for Display and Printing:
These Phones are used for Display when Entering a Work Order or Schedule. They are for DISPLAY PURPOSES ONLY.
They can be Blanked by Right Clicking over the Field. Blanking these Numbers will NOT affect the Phones List.
Remember, these four phones are for DISPLAY PURPOSES ONLY
Phones List:
This is a list of ALL phones where this customer/Business can be reached. The list is unlimited.
If you delete a record in the list, it will delete the corresponding number in the Default Display Only Phones List.
If the phone does not delete from the default list, use Right Mouse over phone in default phones area to remove.
Use Drag and Drop from the phone list to change the default Phones for display. When entering a Phone into the
Phones List, if it is has corresponding Default Phone (WHERE), it will ask if you wish to make it the default phone
for (WHERE) in the Display List. This applies to Home - Work - Cell - Fax ONLY
Edit Phones List:
To re-order the phones list, select the phone and Click one of the arrows under Edit Phones List. This will move the
selected phone, Up-Down-Top-Bottom
(WHERE)
When entering Phones in the Phones List, the program will ask you WHERE the Phone is for.
Select from the List of Where's. You must at least have the 4 Default for Display Only WHERE's defined in the list.
Home - Work - Cell - Fax - SMS
You can Define more WHERE's in Processing > Control > Phones Where Table. The WHERE table is unlimited,
but it is recommended to stay with the basic five locations
You can Edit the Where Table and get rid of silly wheres by going to Processing > Control > Control Menu > Update Pones Where Table. Edit Where Table
Test Messaging: You can also set up Text Messaging in the Phones List.by selecting SMS.
If SMS does not exist, just select anything else and over write with SMS. You will be asked to to Add the record,
Select Yes.
Use the small arrow icons to move the phones up and down the list (Re Order) if you like.
Credit/Tax Info
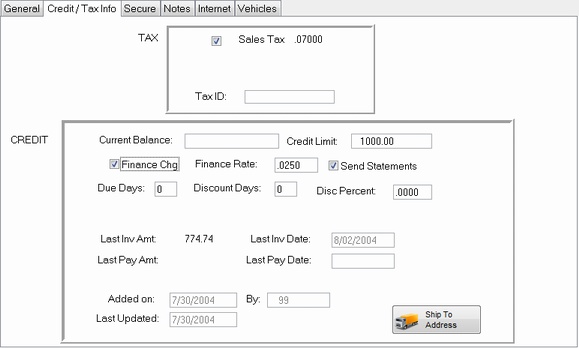
For Tax Exempt Customers, un check Sales Tax and enter their Tax Exempt ID.
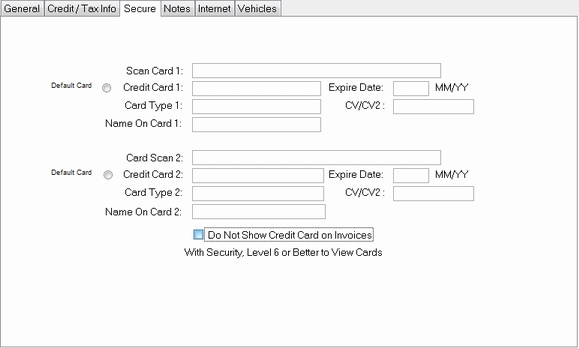
Secure Tab for entering Credit Card info. If you use this, be sure to enable security so normal
employees cannot see the card numbers.
|